Internal restoration has started with the head in the master berth. Anyone dare guess as to why that room was chosen? Restoration of the master head includes the following tasks:
- Re-varnish all floor panels and repair holes in teak around toilet
- Paint all walls
- Re-varnish all wood trim and door panels and drawer fronts
- Build mounting base and install new 12VDC light over mirror (was a 120VAC light there run with electrical cord hanging from wall)
- Install new sink faucet and shower head/hose and control knobs
- Trace electrical wiring problems for blower and lights (new switches)
- Repair teak trim on bulkhead around port light and patch holes for new portlights
- Install new seacock for overboard flush and run all new sanitation hose
- Install new siphon breaks (vents) for raw and black water hoses
- Refurbish Skipper toilet
- Repair / clean bathtub tile
- Install new headliner with sound insulation.
- Replace shower water supply line (it’s some odd copper tubing size – not 3/8″ or 10mm) ?
Work to date has consumed – 125 HOURS
And of course – that’s just the master head – you don’t even want to know how much work is involved in getting the guest head operational.
Take a look at the story on replacing the entire fresh water supply lines in Tortuga.
Posted March 10, 2005
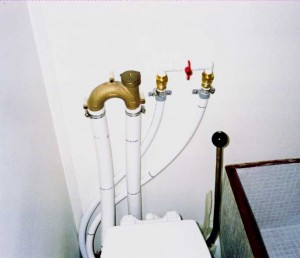
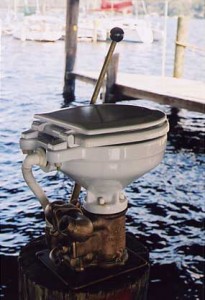
The fix to allow the fresh water holding tank to be used was to replace the anti-siphon valve with a manual ball valve. The picture below shows the change. This valve must be opened prior to adding water for flushing, then closed to avoid flooding the toilet bowel and putting up to six gallons of water on the floor. The new Groco toilet in the forward head is already equipped with a manual valve for flushing that can maintain a leak-proof seal against the head pressure of the fresh water tank.
Posted August 25, 2003
The heads are now flushing ! See the story on the Sea Tech plumbing to learn about this combined fresh water and head restoration project.
Posted July 14, 2003
The Skipper head is due back this week. I completed the rebuild of the Groco HF toilet in the guest head. The rebuild-kit was $75 – a bit pricy if I may say. And to create further problems – the fresh water supply valve gasket did not fit the valve body. It turns out that the rotating bronze block that presses against the flap valve is too large. I had to grind it down about 1mm. It works great now. Sanded and re-varnished the wood floor in the guest head. Began removal of the shower supply valve.
Here’s a fun piece of information. When determining the volume of water necessary to flush the line from your toilet to the holding tank use this formula:
L x 0.0918 where L is the length of 1 1/2 inch sanitation line. Example – 35 ft of line = 3.2 gallons !
Posted June 17, 2003
This is too good to be true! The Wilcox-Crittenden folks have agreed to have me return the Skipper head to them, and they will attempt to make this antique work. That means possibly replacing the bowl and waste flap assembly. I spoke with Tom who combines answering the tech support line with time on the production floor making parts. He was absolutely the best technical support guy I have spoken with for years. I’ll be shipping the whole assembly up the weekend of the 28th. Let’s keep our fingers crossed!
Posted January 2, 2003
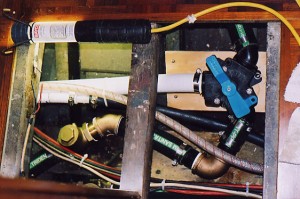
Here’s a quick look at some of the under-floor plumbing. These are the things that my dear wife never sees and then wonders what was I doing all last weekend  This is the diverter (“Y”) valve. Notice I’ve used the best quality Trident sanitation hose everywhere possible. The only exception being the short run from the valve to the toilet so that I can keep a nice appearance behind the head above the flooring. This is in the master berth head. Port side is up, the main sanitation feed to the holding tank is coming from the bottom of the valve going to the left. Notice the brass check valve going to a “Y” adapter. The check valve for the hose going to the forward head is barely visible at the bottom of the picture. The line running up (to port) is to the through-hull overboard discharge. Also notice that this valve has a pad-lock capable handle so that I can convince the Coast Guard that I’m NOT dumping waste overboard in restricted waters. The cut wires on the beam to the left where at one time feeding some unknown appliance. I’m patching them on the next trip. Also note, the vented loop and valve assembly to prevent flooding is above the floor behind the toilet (head). I’ll have pictures of that later.
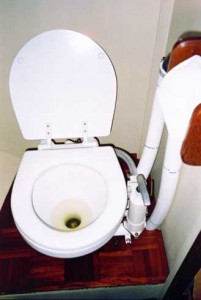
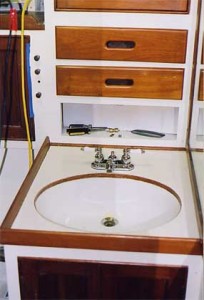
Here are two pictures of the head work completed this weekend.

[…] Marine Head Restoration […]
[…] of you may already be familiar with the head (bathroom) restoration going on. In the middle of that job Steph made the bold suggestion that I configure the toilet […]