Several months ago I posted a tip outlining the process I was using to replace or fabricate new flooring for the engine room. That task is now almost complete (80%) so I have posted additional information to let you know how things have gone.
 The diamond pattern you see to the left was chosen to match the existing floor. Several reasons have caused me to take on this rather lengthy task. First, many of the floor panels had holes cut in them to pass wire or hose that no longer existed. And more importantly, many of the panels simply did not provide a good (safe!) fit and could lead to injury if not replaced.
The Process
The process I have found to work rather well is as follows:
Using standard weight corrugated cardboard (e.g., from a shipping box), Make a template that provides the exact shape for the final floor panel. The cardboard can be cut easily with an Exacto knife. Make sure to use a metal ruler to cut all straight edges.
Clamp the cardboard pattern to the metal flooring stock. I know, this is obvious, but remember (that is – label !) which side is up and forward on the template so that you can easily determine which direction to lay on the metal. Have the smooth side (bottom) of the metal flooring up – that means the pattern needs to be upside down.
Trace around the pattern onto the metal with a medium-point felt tip pen. Remove the pattern.
Using a medium density metal cutting blade in a good quality scrolling saber saw, cut the flooring from the stock. Patience is absolutely mandatory here. The blade will almost certainly over heat if you go to fast.
Once the ruff cut panel is completed, test fit in the engine room. This may be an iterative process of test fitting and trimming (filing) until you get the desired fit.
Once the panel is fit properly, file smooth all edges. Especially those that are near wood beams or wiring. Make sure that if there is wiring near an edge, that you use plastic edge trim to eliminate wear on the wiring harness.
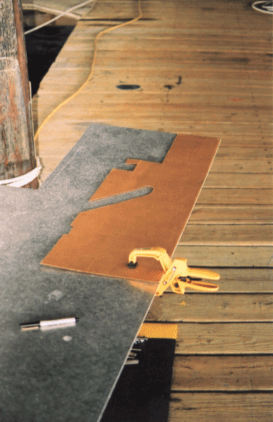
The panel being cut above is for the location immediately to the left of the port engine between the engine and the fuel tanks. As you can see, some of the panels had shapes that were very complex.

[…] Engine Room Flooring Update […]