You may scratch your head and wonder about a wood boat, but there is no doubt about it, they have stood the test of time.
Carvel construction
Carvel planking means the kind you see on older vessels, longitudinal planks nailed or screwed onto steam bent or sawn frames. The advantage of a ‘normally’ or carvel planked boat is that any plank may be removed and replaced without ripping the boat apart. Carvel boats rely on fastenings to hold them together – not glue. Carvel boat building is the best traditional method. This is easily demonstrated by observing all the 70 year old or older carvel boats still in existance.
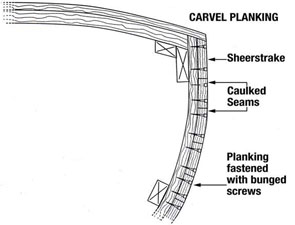
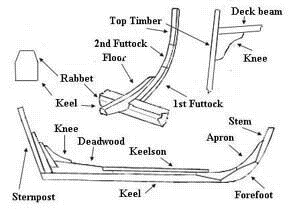
In carvel built vessels the ribs are set up in the right position on the keel and the planks are bent round them and fastened edge to edge so they lie flush with one another. Each single width of planking running the length of the vessel is known as a STRAKE. The strake nearest the keel is the GARBOARD STRAKE and the top one is the SHEER STRAKE. The sheer strake is usually strengthened by a GUNWALE, pronounced and sometimes written as gunnel (a WALE is any extra timber added as band outside the hull). The ends of each strake are fastened to a STEM POST to form the pointed bow and at the other end they can either be fastened to a STERN POST in the same way, making bow and stern similar (a DOUBLE-ENDER), or, more usually, they can be fastened to TRANSOMS, which are timbers running from side to side across the stern and fixed to the stern post. This gives a TRANSOM or SQUARE STERN. Other timbers going across the width in the bottom of the hull are known as FLOORS.
Carvel planking only requires caulking to keep out the water. A few thin coats of paint is all that is required for finishing that allows the wood to breathe. The advantage in carvel construction lies in the relative simplicity of doing annual maintenance. You can change one or two rotten planks if required easily on the annual haul-out.
Modern boatbuilding timber is an unpredictable substance. A plank may rot in two years and adjacent planking may have been there for fifty. The rot resisting ability of any timber species may be affected by where it was grown and how (or if) it was seasoned. It is a shame to see a new boat rot within days of launching, but it happens. Ask the builder, he may say that all the wood from that valley was prone to rot.
It was common up to the late 70’s, to have edge grain 2×12 for planking, 40ft long sitting air drying for many years. We could go and pick out the good planks that had no spots of rot in them or sapwood. No builder in his right mind would use a plank if it had any lighter colored sapwood in it. You must position your pattern on the plank to avoid all the sapwood.
Green or wet lumber is never used. Lumber with knots is not used for planking but sometimes accepted in larger deck beams or coamings.
Edge grain or vertical grain lumber is used for decking and topsides planking. Flat grain may be used below the waterline as the environment there is stable – always wet. Large timbers like keels should be kept covered or in the shade to prevent them checking.
Fastenings hold a carvel wood boat together. Carriage bolt heads are wrapped with candlewick dipped in white lead that form ‘water-tight washers’ when tightened up. When checking over an older wood boat, the nails should be checked – every single one. To see where they are, start by sanding off the copper paint enough to see the nail plugs. If the nail heads are countersunk and cemented, you can use an air powered zip gun with a pointed tip to hammer out the cement. Plugs can be picked out with a short blade ground into a small hook. The nails are tested by being driven with a center punch. Some of them will be like new. Some of them will bend their heads over. In some of them no nail will be found! If you chalk around all the empty holes and look at them you will see strange patterns forming. Possibly a belt running outboard of the bilge stringers. Down in the forefoot near the keel or under the hard bilge radius. Sometimes they amount to thousands of missing nails in an eighty footer, which amounts to more leaking from the fastenings than from the seams. An eighty footer takes about a month to check all the nails.
Many of the major fastenings like for the keel or stem will always remain a mystery unless the item is changed. Nail or screw fastenings in the planking are countersunk and filled with cement or pine plugs. Taper plugs fit the best. Plugs may be put in with thick paint or waterproof glue.
Changing planks. Bad planks should be marked out in chalk. After all the damage is clearly shown a plan must be made to change the planks in such a way that the butts will be arranged to minimize loss of strength and stiffness of the hull. This means that butts shall not lie above each other on the same frame unless separated by two planks, three is preferred but often impossible to achieve in a repair job due to lengths of material available. Like wise, the butts in planks that are next to each other shall be four frames apart or more. A good builder will never use short planks. I have changed planks 36 ft. long because the first few inches was rotting on the stem. This was considered standard first class practice as little as 20 years ago. Unfortunately the last 20 years has seen an end to much of the good timber. Lack of work has allowed few people to become trained and skilled. Silly magazines about people fussing over little dingys glued together with epoxy, cause the old shipwrights to shake their heads and laugh amongst themselves, and spell out the end of a history of real workmen who spent there lives building wooden ships every day.
Removing bad planks: When doing repair work such as changing a few hull planks; After the butts are layed out the planks are removed by cuttingbetween the frames with a small chainsaw and using a splitting bar and pinball. A splitting bar is a steel wedge welded across the top of a round bar handle. It is driven into the center of the plank and pried. This removes the center of the plank first, allowing care to be exercised when getting close to the caulking seems so they are not damaged. After the first plank is removed, the frames are scribed with a knife. This is so that if many planks are removed the planking lines will not be lost. The nails are pulled out with a bar or larger version with a handle up to four feet long called a bearfoot nail bar. The holes in the frames are plugged with sharpened cedar pencil like sticks. Next the frames are scraped, inspected and painted with wood preservatives like cuprinol or penta-phenol. Creosote has reportedly made some boats uninhabitable.
Replacing the planks: The new planking is dressed to thickness. Some extra thickness is allowed where planks are shaped to fit over tightly radiused frames. They will have to be scalloped out on the back to fit the curved frames properly or they will split when nailed and countersunk. Making plank patterns is called spiling. Patterns are made of 1/8 or 1/4 inch plywood screwed or stapled together for the length required. The pattern must sit flat on all the frames and have no edge set or tension in it. The pattern should not touch the adjacent plank or cross the scribed planking lines. The angle to the upper and lower plank is marked on the pattern about every foot. 5 means five degrees over 90 degrees. 5U means five degrees under square or 90 degrees. Next the seams are scribed onto the pattern using a parallel block about 2 inches wide. Dividers are the correct method because each prick mark is circled in pencil, and when later when transferred onto the new planking material may be easily seen when half planed through with an electric plane – highly accurate. The butts should be marked with a parallel block.
The pattern is carefully removed. If marked using the above standard planking notation any other workman can read the pattern and cut the plank. Next the pattern is layed on the dressed new planking material. If the outside face of the plank is wider than the inside of the plank the pattern markings will have to be transferred with dividers to the back side of the new plank. A good percentage of the time this is not the case and you can cheat by just laying the pattern on the outside face of the new plank. The marks and notation are transferred to the new material. The pattern is removed. Do yourself a favor and mark which end goes towards the bow with an arrow and which way is up. Use a batten made from clear lumber as long as the plank or longer about 1/2 x 3 or 3/4×3/4 or whatever is required to bend stiffly and fairly through all the marks you made. The batten is nailed to the new plank just barely using fine nails like shingle nails. Now the batten is sighted for fairness. A slight discontinuity may be noticed if the seam being marked had a butt in the planks below it. This must be accepted or the seam will be too wide at that butt. The line is penciled in. The batten may be flipped off the plank and saved for the next one with only having to tap the same nails back out slightly. Next the plank is sawn on the band saw or for easy stuff use a real worm drive Skilsaw. If the bevel rolls much as is common on well flared bows, it must be sawn by the band saw. The degree markings you marked onto the plank are read by the person who adjusts the band saw tilt, as you feed it through. One place I worked we added a couple of degrees onto the bevels which made the cut include the caulking seem. This was considered acceptable practice when replanking, as the plank would swell up in the steam box anyways. When planking thick or new jobs they are best cut to the bevel and a caulking seem added after by plane. Next the sawn edges are faired by electric plane to the pencil line or scribed dividers prick mark. One will note many boats were planked with one the upper edge left square as much as possible and the lower edge beveled to suit. Also long narrow planks may be edge set some for better utilization of narrower planking material. Most of those 36ft planks were 2×6 fir. After fairing the seam is penciled onto the edges and planed off. 3/16″ is fine for 1 3/4 planking, 5/32″ for thinner. when caulked the iron will open it up, unless the planking is teak which compresses very little. A final slight chamfering of the inside edges is done to prevent the edges digging into the adjacent planks when installing. Paint the inside of the plank with preservative and put some linseed oil on the edges for a lubricant.
Next the planks are steamed once the steam pressure is up for about 1 – 2 hours depending on the thickness from 1 – 2 inches or more. When the plank comes out of the box there is no time for fools to go running for tools. Time is critical. Power cords and drills with countersinks, shores and wedges must be ready. The frame nail lines on the existing hull should be marked with chalk. The plank is placed one end onto the hull and the other end held out supported by an assistant. Nail on the end first which has the most bend to it – the plank itself will act as a lever. This is easier than trying to bend the last 4 feet of a plank which is cooling off and becoming stiff. Drill 4 or 5 pilot holes and countersink them at that end. I prefer using taper drills that match the nail size because that way I don’t split the plank or the frame. Nail on that end and start pushing in the plank. Use shores and wedges to drive it into place. It may be hit with the pinball using a block of wood for a cushion. Work your way along drilling and nailing until you reach the end. At that time you will have to cut off the few extra inches you left on to make the butt fit perfect. Planks tend to get shorter as they are bent around the bow. Nail in the butt and then go over the plank again from the start and use the nail set to set the nail heads about 3/8″ below the surface. Plane off any uneven areas and finish sand with an orbital slow speed sander/polisher after plugging. Read lead putty may be used instead of plugs.
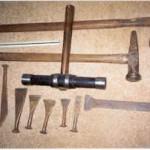 Top: 8 lb pinball, for rallying wedges and big stuff. That white thing is a 12″ scale for size comparison.
Middle: caulking mall, black mesquite with tapered Drew rings
Lower row, left to right: reefing hook, straight reefing iron, same, setting iron, maker, bent iron, threading iron, spiking iron and a pitch scraper. Best caulking tools were made by C. Drew & Co. of Kingston Massachusetts.
Next clean the seams out with a thin reefing iron and paint them with linseed oil. Two threads of cotton should be fine, the first one put in straight with no bights. More linseed oil will keep it from rotting for years. Next caulk with oakum if a larger boat or two more heavier bighted threads of cotton will suffice. If its a barge deck you may try double threads of spun oakum at once, horsing it in with a beetle (a large wooden mallet) and horsing iron( a large iron with loosely attached handle) to suit the seam widths. Use a threading iron 0 or 00 to thread and a wider iron to set the caulking as it is filled. Many strings are OK compared with overworking it by choking large bights. It is a skill that improves after 10 years practice. The mallet is a wooden handled maul with a long head about 16 long by 2 of black mesquite wood with 4 hardened rings that never deform when hitting the softer more malleable irons. A 115 ft Trawler make take 500 Lbs of oakum. Caulking cotton comes spun into a thread of suitable width for caulking and in one pound bundles.
Oakum comes in 50 lb. bales composed of roughly spun bundles of 5 to 8 lbs. each. These bundles must be loosened up a little by pushing on them so the beginning of the thread may be retrieved from the inside of the bundle. Once loosened up the thread will keep coming out as it is pulled. The oakum must now be spun into even threads that suit the seam width being caulked. The method employed is to sit down on a bench or caulking stool with a burlap sack draped over your lap. As the rough oakum is pulled out from the bundle on one side of you it is rolled with the palms of both hands against your legs and stretched at the same time into an even clean thread. Much bark and particles unsuitable for putting into the seam will fall out or must be picked out. The spun oakum piles up into a coil on the other side of you. When the bundle is spun it is recoiled into loops about 10 inches long of about 20 loops and finished with about 3 wraps around the middle to secure. This is the spun oakum that is taken out into the yard in sufficient quantity to supply the caulkers need until lunch or quitting time. It is suitable to spin two times a day as this much relieves the arduous task of caulking for a few hours a day. An 8 lb. bundle may take an hour or more to spin depending on how matted or full of bark it may be. Bales of oakum should be selected that are dark in color with oil. Dried out bales should be exchanged. Scandinavia supplies good spun Viking oakum. I have seen American oakum spun into dry tape like threads and found it inferior. Always mark out with chalk and caulk a complete square area of adjacent planking at a time, say 10 ft. lengths by 6 seams high. Leave a few inches of caulking tails hanging out at the end of the seams so you don’t lose track of what has been done. A good goal is 100 to 120 lineal ft. per day, depending on the number of threads required.
Putty the seams with red lead putty above the waterline. Below you may use Portland cement. You can speed up the drying by adding backing soda. Make your own below the waterline seam compound: For a first class job mix in a empty 5 gallon can – 1 gallon fibergum with the same can filled with Portland cement. 1 to 1 by volume. Mix with a half inch drill with a two foot long 1/2 bar bent at 90 degrees for 3 inches at the end. Use a tiger torch to heat it up while mixing. Do not add any liquids – it will mix. This compound is flexible and non damaging to the planking down the road in the future. It was a navy specification apparently. It may be easily cleaned off the surface with a scraper and smoothed with a course disc. Paint with anti fouling XXX or vinylux.
Framing. Use real white bending oak from the South Eastern U.S. The lumber of course is green, kept in the shade, stored wet and salted down. Framing is even tougher work than planking. Better to work when its cool. It is a good idea to relieve the planking of the caulking before reframing so the planking can move when fastened and have good tight contact with the new frames. Prepare the boat by clearing a path for the new sister ribs by removing blocks and nails etc. Cut notches for the new frames through the engine stringers and notch sockets into the keel.
Steam box time: 1/2 hour minimum for small frames, an hour is fine for most. Do not over steam, it ruins the strength of the wood. Put only enough frames in the steam box that you will be able to put in the boat in an hour period. . Again shores and wood wedges are indispensable. A handy item would be to have a metal cap you could put over the frame head to prevent them splitting as you drive down the frame between the planking and the stringers. The frame corners should be beveled to prevent splitting in this case. Bevel off the bottom outboard end so it will not dig into the planking as it slides beneath the stringers or around the curve of the bilge, heading under the new notches you cut in the engine stringers until it sets into the new notches cut into the hog or keelson. During its journey towards the keel it must be shored and wedged into the curved shape of the bilge radius or it will simply knock off the planking. The planking may have to be shored up from the outside to prevent this happening.
Once pounded down solid into the sockets and shored and wedged out against the hull planking it is time to nail. One person on the inside with the pinball backing against the frame close by where the nail is coming through. This stops the frame from bouncing and ensures when countersunk that the plank and frame are well cinched tight together. The nailer on the outside can nail in a series so not to confuse the inside assistant. After setting the nails with a nail set, the small amount of boat nail that protrudes through the frame inside may be banged over flush with the frame face. The boat nails are chisel point. The chisel point cuts across the frame grain cutting it, instead of wedging and splitting it. You will notice the nail heads are elongated to provide more grip across the plank grain rings. One frame may take 5-10 minutes, so if you are putting in 8 at one time into the steam box you should be OK. A steam box can be made of plywood with 2×2 in the corners. Sections 8 ft. long can be made to join together. One end must have a hinged door. A metal pipe goes to the boiler. I always have used two steel drums. A 25 gallon ‘boiler’ suspended inside a 45 gal drum burner. I use a 20 lb. propane tank and tiger torch, it will last for two hours wide open. Wood works fine too but may damage the ground from all the heat. When opening the steam box door expect a blast of steam to go up your sleeve, so wear gloves. After reframing, the boat must be recaulked.
Copyright © 2002 Trevor Bolt.

Follow Us!