The importance of correct procedures.
We’ve said that a brazed joint “makes itself” – or that capillary action, more than operator skill, insures the distribution of the filler metal into the joint. The real skill lies in the design and engineering of the joint. But even a properly-designed joint can turn out imperfectly if correct brazing procedures are not followed. These procedures boil down to six basic steps. They are generally simple to perform (some may take only a few seconds), but none of them should be omitted from your brazing operation if you want to end up with sound, strong, neat-appearing joints. For the sake of simplicity, we’ll discuss these six steps mainly in terms of “manual brazing,” that is, brazing with hand-held torch and hand-fed filler metal. But everything said about manual brazing applies as well to mass production brazing. The same steps must be taken, although they may be performed in a different manner.
Step 1: Good fit and proper clearances.
Brazing, as we’ve seen, uses the principle of capillary action to distribute the molten filler metal between the surfaces of the base metals. Therefore, during the brazing operation, you should take care to maintain a clearance between the base metals to allow capillary action to work most effectively. This means, in almost all cases – a close clearance. The following chart is based on brazing butt joints of stainless steel, using Handy & Harman’s Easy-Flo filler metal. It shows how the tensile strength of the brazed joint varies with the amount of clearance between the parts being joined.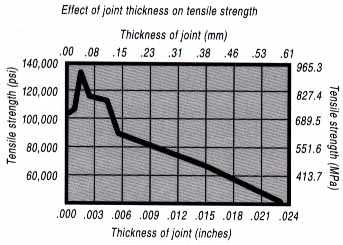
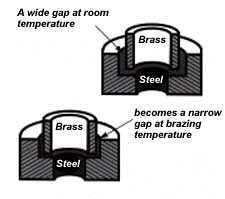
Note that the strongest joint (135,000 psi/930.8 MPa) is achieved when the joint clearance is .0015″ (.038mm.) When the clearance is narrower than this, it’s harder for the filler metal to distribute itself adequately throughout the entire joint – and joint strength is reduced. Conversely, if the gap is wider than necessary, the strength of the joint will be reduced almost to that of the filler metal itself. Also, capillary action is reduced, so the filler metal may fail to fill the joint completely – again lowering joint strength. So the ideal clearance for a brazed joint, in the example above, is in the neighborhood of .0015″ (.038mm.) But in ordinary day-to-day brazing, you don’t have to be this precise to get a sufficiently strong joint. Capillary action operates over a range of clearances, so you get a certain amount of leeway. Look at the chart again, and see that clearances ranging from .001″ to .005″ (.025 mm to .127 mm) still produce joints of 100,000 psi (689.5 MPa) tensile strength. Translated into everyday shop practice – an easy slip fit will give you a perfectly adequate brazed joint between two tubular parts. And if you’re joining two flat parts, you can simply rest one on top of the other. The metal-to-metal contact is all the clearance you’ll usually need, since the average “mill finish” of metals provides enough surface roughness to create capillary “paths” for the flow of molten filler metal. (Highly polished surfaces, on the other hand, tend to restrict filler metal flow.) However, there’s a special factor you should consider carefully in planning your joint clearances. Brazed joints are made at brazing temperatures, not at room temperature. So you must take into account the “coefficient of thermal expansion” of the metals being joined. This is particularly true of tubular assemblies in which dissimilar metals are joined. As an example, let’s say you’re brazing a brass bushing into a steel sleeve. Brass expands, when heated, more than steel. So if you machine the parts to have a room temperature clearance of .002″-.003″ (.051 mm- .076 mm), by the time you’ve heated the parts to brazing temperatures the gap may have closed completely! The answer? Allow a greater initial clearance, so that the gap at brazing temperature will be about .002″-.003″ (.051 mm-.076 mm.)
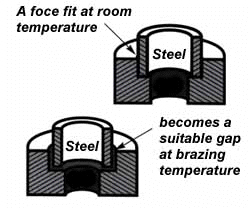
Of course, the same principle holds in reverse. If the outer part is brass and the inner part steel, you can start with virtually a light force fit at room temperature. By the time you reach brazing temperature, the more rapid expansion of the brass creates a suitable clearance.
How much allowance should you make for expansion and contraction? It depends on the nature and sizes of the metals being joined and the configuration of the joint itself. Although there are many variables involved in pin-pointing exact clearance tolerances for each situation, keep in mind the principle involved different metals expand at different rates when heated. To help you in planning proper clearances in brazing dissimilar metals, the chart on the opposite page furnishes the coefficient of thermal expansion for a variety of metals and alloys.
Step 2: Cleaning the metals.
Capillary action will work properly only when the surfaces of the metals are clean. If they are “contaminated” – coated with oil, grease, rust, scale or just plain dirt – those contaminants have to be removed. If they remain, they will form a barrier between the base metal surfaces and the brazing materials. An oily base metal, for example, will repel the flux, leaving bare spots that oxidize under heat and result in voids. Oil and grease will carbonize when heated, forming a film over which the filler metal will not flow. And brazing filler metal won’t bond to a rusty surface. Cleaning the metal parts is seldom a complicated job, but it has to be done in the right sequence. Oil and grease should be removed first, because an acid pickle solution aimed to remove rust and scale won’t work on a greasy surface. (If you try to remove rust or scale by abrasive cleaning, before getting rid of the oil, you’ll wind up scrubbing the oil, as well as fine abrasive powder, more deeply into the surface.) Start by getting rid of oil and grease. In most cases you can do it very easily either by dipping the parts into a suitable degreasing solvent, by vapor degreasing, or by alkaline or aqueous cleaning. If the metal surfaces are coated with oxide or scale, you can remove those contaminants chemically or mechanically. For chemical removal, use an acid pickle treatment, making sure that the chemicals are compatible with the base metals being cleaned, and that no acid traces remain in crevices or blind holes. Mechanical removal calls for abrasive cleaning. Particularly in repair brazing, where parts may be very dirty or heavily rusted, you can speed the cleaning process by using emery cloth, grinding wheel, or file or grit blast, followed by a rinsing operation. Once the parts are thoroughly clean, it’s a good idea to flux and braze as soon as possible. That way, there’s the least chance for recontamination of surfaces by factory dust or body oils deposited through handling.
Step 3: Fluxing the parts.
Flux is a chemical compound applied to the joint surfaces before brazing. Its use is essential in the brazing process (with a few exceptions noted later.) The reason? Heating a metal surface accelerates the formation of oxides, the result of chemical combination between the hot metal and oxygen in the air. These oxides must be prevented from forming or they’ll inhibit the brazing filler metal from wetting and bonding to the surfaces. A coating of flux on the joint area, however, will shield the surfaces from the air, pre- venting oxide formation. And the flux will also dissolve and absorb any oxides that form during heating or that were not completely removed in the cleaning process. How do you apply the flux to the joint? Any way you can, as long as you cover the surfaces completely. Since flux is conventionally made in a paste consistency, it’s usually most convenient to brush it on. But as production quantities increase, it may be more efficient to apply the flux by dip- ping – or dispensing a pre-measured deposit of high viscosity dispensable flux from an applicator gun. Why dispensable flux? Many companies find the repeatable deposit size improves joint consistency, and because typically less flux is used, the amount of residue entering the waste stream is also reduced.
When do you flux? Typically just before brazing, if possible. That way the flux has least chance to dry out and flake off, or get knocked off the parts in handling. Which flux do you use? Choose the one formulated for the specific metals, temperatures and conditions of your brazing application. There are fluxes formulated for practically every need; for example – fluxes for brazing at very high temperatures (in the 2000°F/1093°C area), fluxes for metals with refractory oxides, fluxes for long heating cycles, and fluxes for dispensing by automated machines. Fortunately, your inventory problem is considerably simplified by the avail- ability of general-purpose fluxes, such as Handy & Harman’s Handy Flux, which is suitable for most typical brazing jobs. (See page 40 for a chart of Handy & Harman/Lucas-Milhaupt fluxes.) Our technical representative can answer any questions you may have and assist you in your choice. How much flux do you use? Enough to last throughout the entire heating cycle. Keep in mind that the larger and heavier the pieces brazed, the longer the heating cycle will take – so use more flux. (Lighter pieces, of course, heat up taster and so require less flux.) As a general rule, don’t skimp on the flux. It’s your insurance against oxidation. Think of the flux as a sort of blotter. It absorbs oxides like a sponge absorbs water. An insufficient amount of flux will quickly become saturated and lose its effectiveness. A flux that absorbs less oxides not only insures a better joint than a totally saturated flux, but it is a lot easier to wash off after the brazed joint is completed. Flux can also act as a temperature indicator, minimizing the chance of overheating the parts. Handy & Harman’s Handy Flux, for example, becomes completely clear and active at 1100°F/593°C. At this temperature, it looks like water and reveals the bright metal surface underneath – telling you that the base metal is just about hot enough to melt the brazing filler metal.
| Temperature | Appearance of flux |
| 212°F (100°C) | Water boils off. |
| 600°F (315°C) | Flux becomes white and slightly puffy, and starts to “work.” |
| 800°F (435°C) | Flux lies against surface and has a milky appearance. |
| 1100°F (593°C) | Flux is completely clear and active, looks like water. Bright metal surface is visible underneath, At this point, test the temperature be touching brazing filler metal to base metal, If brazing filler metal melts, assembly is at proper temperature for brazing. |
We’ve said that fluxing is an essential step in the brazing operation. This is generally true, yet there are a few exceptions to the rule. You can join copper to copper without flux, by using a brazing filler metal specially formulated for the job, such as Handy & Harman’s Sil-Fos or Fos-Flo 7. (The phosphorus in these alloys acts as a fluxing agent on copper.) And you can often omit fluxing if you’re going to braze the assembly in a controlled atmosphere. A controlled atmosphere is a gaseous mixture contained in an enclosed space, usually a brazing furnace. The atmosphere (such as hydrogen, nitrogen or dissociated ammonia) completely envelops the assemblies and, by excluding oxygen, prevents oxidation. Even in controlled atmosphere brazing, however you may find that a small amount of flux improves the wetting action of the brazing filler metal.
Step 4: Assembly for brazing.
The parts of the assembly are cleaned and fluxed. Now you have to hold them in position for brazing. And you want to be sure they remain in correct alignment during the heating and cooling cycles, so that capillary action can do its job. If the shape and weight of the parts permit, the simplest way to hold them together is by gravity.
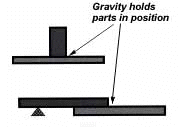
Or you can give gravity a helping hand by adding additional weight.
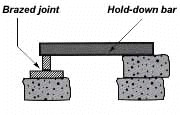
If you have a number of assemblies to braze and their configuration is too complex for self-support or clamping, it may be a good idea to use a brazing support fixture. In planning such a fixture, design it for the least possible mass, and the least contact with the parts of the assembly. (A cumbersome fixture that contacts the assembly broadly will conduct heat away from the joint area.) Use pin-point and knife-edge design to reduce contact to the minimum.
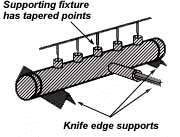
Try to use materials in your fixture that are poor heat conductors, such as stainless steel, Inconel or ceramics. Since these are poor conductors, they draw the least heat away from the joint. Choose materials with compatible expansion rates so you won’t get alterations in assembly alignment during the heating cycle. However, if you’re planning to braze hundreds of identical assemblies, then you should think in terms of designing the parts themselves for self- support during the brazing process. At the initial planning stage, design mechanical devices that will accomplish this purpose, and that can he incorporated in the fabricating operation. Typical devices include crimping, interlocking seams, swaging, peening, riveting, pinning, dimpling or knurling. Sharp corners should be minimized in these mechanically held assemblies, as such corners can impede capillary action. Corners should be slightly rounded to aid the flow of filler metal.
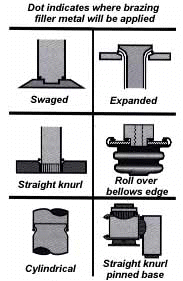
The simplest mechanical holding device is the best, since its only function is to hold the parts together while the permanent joint is made by brazing.
Step 5: Brazing the assembly.
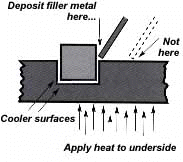
The fifth step is the actual accomplishment of the brazing joint. It involves heating the assembly to brazing temperature, and flowing the filler metal through the joint. First, the heating process. As we’ve seen in brazing, you apply heat broadly to the base metals. If you’re brazing a small assembly, you may heat the entire assembly to the flow point of the brazing filler metal. If you’re brazing a large assembly, you heat a broad area around the joint. The heating method most commonly used in brazing a single assembly is the hand held torch. A variety of fuels are available – natural gas, acetylene, propane, propylene, etc., combusted with either oxygen or air. (Most popular is still the oxy/acetylene mixture.) All you have to keep in mind is that both metals in the assembly should be heated as uniformly as possible so they reach brazing temperature at the same time. When joining a heavy section to a thin section, the “splash-off” of the flame may be sufficient to heat the thin part. Keep the torch moving at all times and do not heat the braze area directly. When joining heavy sections, the flux may become transparent – which is at 1100°F (593°C) – before the full assembly is hot enough to receive the filler metal. Some metals are good conductors – and consequently carry off heat faster into cooler areas. Others are poor conductors and tend to retain heat and overheat readily. The good conductors will need more heat than the poor conductors, simply because they dissipate the heat more rapidly. In all cases, your best insurance against uneven heating is to keep a watchful eye on the flux. If the flux changes in appearance uniformly, the parts are being heated evenly, regard- less of the difference in their mass or conductivity. You’ve heated the assembly to brazing temperature. Now you are ready to deposit the filler metal. In manual brazing, all this involves is carefully holding the rod or wire against the joint area. The heated assembly will melt off a portion of the filler metal, which will instantly be drawn by capillary action throughout the entire joint area. You may want to add some flux to the end of the filler metal rod – about 2″ to 3″ (51 mm to 76 mm) – to improve the flow. This can be accomplished by either brushing on or dipping the rod in flux. On larger parts requiring longer heating time, or where the flux has become saturated with much oxide, the addition of fresh flux on the filler metal will improve the flow and penetration of the filler metal into the joint area. However, there is one small pre- caution to observe. Molten brazing filler metal tends to flow toward areas of higher temperature. In the heated assembly, the outer base metal surfaces may be slightly hotter than the interior joint surfaces. So take care to deposit the filler metal immediately adjacent to the joint. If you deposit it away from the joint, it tends to plate over the hot surfaces rather than flow into the joint. In addition, it’s best to heat the side of the assembly opposite the point where you’re going to feed the filler metal. In the example above, you heat the underside of the larger plate, so that the heat draws the filler metal down fully into the joint. (Always remember – the filler metal tends to flow toward the source of heat.) And if you’re using preforms – slugs, washers, shims or special shapes of filler metal – preplace them at the joint area before you heat the assembly.
Step 6: Cleaning the brazed joint.
After you’ve brazed the assembly, you have to clean it. And cleaning is usually a two-step operation. First – removal of the flux residues. Second – pickling to remove any oxide scale formed during the brazing process. Flux removal is a simple, but essential operation. (Flux residues are chemically corrosive and, if not removed, could weaken certain joints.) Since most brazing fluxes are water soluble, the easiest way to remove them is to quench the assembly in hot water (120°F/50°C or hotter). Best bet is to immerse them while they’re still hot, just making sure that the filler metal has solidified completely before quenching. The glass-like flux residues will usually crack and flake off. If they’re a little stubborn, brush them lightly with a wire brush while the assembly is still in the hot water. You can use more elaborate methods of removing flux as well – an ultra- sonic cleaning tank to speed the action of the hot water, or live steam.
Two tables here somehow
The only time you run into trouble removing flux is when you haven’t used enough of it to begin with, or you’ve overheated the parts during the brazing process. Then the flux becomes totally saturated with oxides, usually turning green or black. In this case, the flux has to be removed by a mild acid solution. A 25% hydrochloric acid bath (heated to 140- 160°F/60-70°C) will usually dissolve the most stubborn flux residues. Simply agitate the brazed assembly in this solution for 30 seconds to 2 minutes. No need to brush. A word of caution, however – acid solutions are potent, so when quenching hot brazed assemblies in an acid bath, be sure to wear a face shield and gloves. After you’ve gotten rid of the flux, use a pickling solution to remove any oxides that remain on areas that were unprotected by flux during the brazing process. The best pickle to use is generally the one recommended by the manufacturer of the brazing materials you’re using. (See the Handy & Harman recommendations for pickling solutions on the opposite page.) Highly oxidizing pickling solutions, such as bright dips containing nitric acid, should be avoided if possible, as they attack the silver filler metal. If you do find it necessary to use them, keep the pickling time very short. Once the flux and oxides are removed from the brazed assembly, further finishing operations are seldom needed. The assembly is ready for use, or for the application of an electroplated finish. In the few instances where you need an ultra-clean finish, you can get it by polishing the assembly with a fine emery cloth. If the assemblies are going to be stored for use at a later time, give them a light rust-resistant protective coating by adding a water soluble oil to the final rinse water.
Basic steps in brazing
- Ensure fit and clearance
- Clean metal
- Flux prior to brazing
- Fixturing of parts
- Brazing the assembly
- Cleaning the new joint
Hidden treasure in your scrap.
There’s one last thing you should take into account, as part of your cleaning and finishing operations – the possible salvage value of your brazing scrap. Brazing filler metals may contain silver, often in fairly high proportions. So does the filler metal scrap. And that silver is reclaimable at a good price. It’s hard to believe that the amount of scrap you generate in your brazing operation is large enough to warrant salvaging. But consider this true story … A Handy & Harman brazing representative, inquiring about scrap salvage, was told by a plant superintendent, “We don’t have any brazing scrap. We tack the rod stubs and coil ends together and use them up.” The representative, however, noticed some brazing filler metal drip- pings hanging from the fixtures of a conveyorized brazing operation. He took a couple of samples for lab analysis. Some weeks later he presented the superintendent with a bright disc of pure silver. The silver had been refined from those few “worthless” drippings. From then on, those conveyor fixtures were cleaned regularly – and every bit of scrap accumulated for its silver value. Conveyor fixture drippings are just one source of reclaimable silver. There are others. For example, sup- pose you’re hand-cutting brazing filler metal strip to make custom-shaped shims for brazing carbide tool tips. The leftover scrap has just as high a silver content as the brazing shim itself. Depending on the nature of your brazing operations, there’s always the possibility that you’re generating enough scrap to make accumulation of it over a period of time very worth- while. The fact is – the refining of brazing filler metal scrap can often substantially reduce the cost of brazing operations. Your Handy & Harman/ Lucas-Milhaupt representative can help you spot the “hidden treasure” in your operation and implement the best salvage procedures.
Balancing the picture.
We’ve discussed the six basic steps required in correct brazing procedures. And we’ve gone into a fair amount of detail in order to be as informative as possible. To get a more balanced picture of the overall brazing process, it’s important to note that in most day-to-day brazing work, these steps are accomplished very rapidly. Take the cleaning process, for example. Newly-fabricated metal parts may need no cleaning at all. When they do, a quick dip, dozens at a time, in a degreasing solution does the job. Fluxing is usually no more than a fast dab of a brush or dipping ends of the parts in flux. Heating can often be accomplished in seconds with an oxy-acetylene torch. And flowing the filler metal is virtually instantaneous, thanks to capillary action. Finally, flux removal is generally no more than a hot water rinse, and oxide removal needs only a dip into an acid bath. There are exceptions to the rule, of course, but in most cases a brazed joint is made fast – considerably faster than a linear welded joint. And, as we’ll see later on, these economies in time and labor are multiplied many times over in high production automated brazing. The pure speed of brazing represents one of its most significant advantages as a metal joining process.
Safety in Brazing
In brazing, there is always the possibility of dangerous fumes and gases rising from base metal coatings, ink and cadmium-bearing filler metals, and from fluorides in fluxes. The following well-tested precautions should be followed to guard against any hazard from these fumes.
- Ventilate confined areas. Use ventilating fans and exhaust hoods to carry all fumes and gases away from work, and air supplied respirators as required.
- Clean base metals thoroughly, A surface contaminant of unknown composition on base metals may add to fume hazard and may cause a too rapid breakdown of flux, leading to over heating.
- Use sufficient flux. Flux protects base metals and filler metal during heating cycle. Full flux coverage reduces fuming, Also, consult your MSDS regarding specific hazards associated with brazing flux.
- Heat metals broadly. Heat the base metals broadly and uniformly. Intense localized heating uses up flux, increases danger of fuming.
- Know you base metals. A cadmium coating on a base metal volatilize and produce toxic fume during heating. Zinc coatings (galvanized) will also fume when heated. Learn to recognize these coatings. It is recommended that they be removed before parts are heated for brazing.
- Know you fill metals. Be especially careful not to overheat assembly when using filler metals that contain cadmium. Consult the Material Safety Data Sheet for maximum recommended brazing temperatures of a specific filler metal. The filler metal carries a warning label. Be sure to look for it and follow the instructions.
(For safety considerations, see the American National Standard Z49.1, “Safety in Welding and Cutting”, published be the American Welding Society (AWS), 550 N.W. LeJeune Rd., Miami, Florida 33126.)
Recommended pickling solutions for post-braze removal of oxides
The pickling solutions recommended below may be used to remove oxides from areas that were not protected by flux during the brazing process. In general, they should be used after the flux residue has been removed from the brazed assembly.
| Application | Formulation | Comments |
| Oxide removal from copper, brass, bronze, nickel silver and other copper alloys containing high percentages of copper. | 10 to 25% hot sulphuric acid with 5 to 10% potassium dichromate added. | Pickling can be done at same time flux is removed. Will work on carbon steels, but if pickle is contaminated with copper, the copper will plate out on the steel and will have to be removed mechanically. This sulphuric pickle will remove copper or cuprous oxide stains from copper alloys. It is an oxidizing pickle, and will discolor the silver filler metal, leaving it a dull gray. |
| Oxide removal from irons and steels. | A 50% hydrochloric acid solution, used cold or warm, More diluted acid can be used (10 to 25%) at higher temperatures (140-160°F/60-70°C.) | A mixture of 1 part hydrochloric acid to 2 parts water can be used for Monel and other high nickel alloys. Pickling solution should be heated to about 180’F/80’C. Mechanical finishing is necessary for bright finishes. This HCI pickle is not like bright dips on nonferrous metals. |
| Oxide removal stainless steels and alloys containing chromium. | 20% sulphuric acid, 20% hydrochloric acid, 60% water, used at a temperature of 170-180°F(75-80°C.) | This pickle is followed directly by a 10% nitric dip, and then a clean water rinse. |
| 20% hydrochloric acid, 10% nitric acid, 70% water, used at about 150°F(65°C.) | This pickle is more aggressive than the sulphuric-hydrochloric mixture listed above, and will etch both the steel and the filler metal. |
Note: The pickles recommended above will work with any of the standard silver filler metals, and no specific instructions are required for the individual filler metals. The phos-copper and silver-bearing phos-copper filler metals are different, and then only when used on copper without flux. In this case, a hard copper phosphate slag forms in small globules on the metal surface. Prolonged pickling in sulphuric acid will remove this slag, but a short pickle in 50% hydrochloric acid for a few minutes is more effective. When the brazed joint is to be plated or tinned, the removal of the slag is absolutely essential. A final mechanical cleaning, therefore, is advisable for work which is to be plated.
* Consult your supplier or local environmental restrictions regarding the proper product disposal information for your area.
Back to the Brazing Book.

[…] The Six Basic Steps in Brazing […]